Showing posts with label Weekend Wrap-Up. Show all posts

December 9, 2012

Wine Cork Card Holder


Last week I hit a huge accomplishment on this little blog - 400 Followers, and still growing! Thank you everyone for following and reading this little blog of mine!

Cardigan: Target {Old} // TShirt: Target {Old} // Tights: Target $19.99 // Boots: Marshalls $49.99
Sunday:  Pinterest Project Time!  Unfortunately I can't show you all of my projects because some of them are gifts and I don't want to give it away!

Wine Cork Card Holder 
Yard Stick: $4 Wal-Mart
Glue Gun and Glue Sticks: Gun $2.77 and Glue $1.98 Wal-Mart
Corks: Free (unless you count the cost of drinking all of the wine!

Glue corks onto yard stick and hang with a nail.  Use push pins to display christmas cards or photos. If you missed how to make the Glitter Reindeer, Click Here.


Even the Kitties are starting to get into the Christmas spirit.  So much so that Ben decided to climb half-way up the Christmas Tree!!


December 3, 2012

Glitter Reindeer on Canvas

Glitter Reindeer on a Canvas

What you need:
Canvas (I used 16X20 and printed deer head on 11x17, but Shanna used 12X16 and printed head on 8 1/2 X 11)
Glitter
Scissors
Pencil
Tape
Sponge Brush
Elmers Glue
Hairspray

1. Print out Reindeer Head - here {or gooogle reindeer head silhouette)
2. Cut-out
3. Apply tape to the back of the reindeer and stick it onto the canvas and trace
4. Using a sponge brush apply a generous amount of Elmers glue on the traced Reindeer
5. Cover with Glitter
6. Wait 1 minute and shake off extra glitter onto Aluminum foil so it's easy to pour the excess back into the container
7. Touch-up any places with a Q-tip
8. Spray with Hairspray to keep the glitter from falling off


This weekend cousin took a bunch of outfit pictures of me for this here little blog.  I can't wait to share them all with you!  Preview Below:


Holiday

November 5, 2012

Framed Initials: Garage-Sale Style

FRAMED INITIALS
Large Frame - $2 Garage Sale
2 Small Frames - $1 Each Garage Sale
Letters - $10 each, but were ½ off so $15 total
Rustoleum Metallic Oil Rubbed Bronze Spray Paint (works like magic): $8
TOTAL COST: $27


Project #2: Spray Paint giant decorative Piece
Decorative Piece – FREE From my In-laws
Spray Paint – Leftover from previous Project

I just bought a new towel bar to match this decorative piece, but haven't installed it yet.


Linking-up!

October 22, 2012

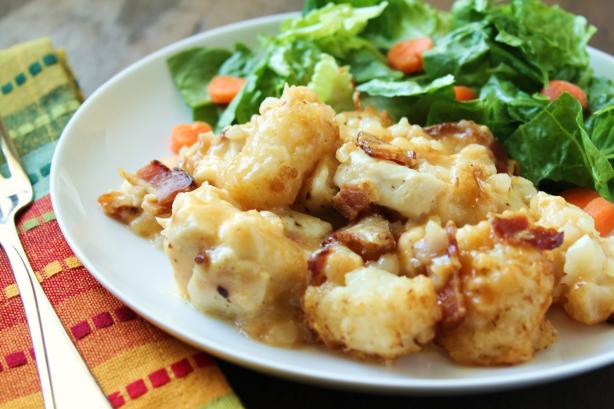
Cheesy Chicken Crock Pot Casserole

Image courtesy of food.com
Cheesy Chicken, Bacon & Tater Tot Crock Pot Bake (my variations are in pink)

Read more at: http://www.food.com/recipe/cheesy-chicken-bacon-tater-tot-crock-pot-bake-403520?oc=linkback


1 (32 ounce) bag tater tots
0.5 (3 ounce) jar bacon bits (I used Hormel brand) - I made my own bacon and chopped it in my mini food processor
5 boneless skinless chicken breasts - Next time I would cut the chicken into pieces so it's more like a casserole, the whole chicken breasts were kind of weird
1 1/2 cups grated colby cheese - I used Mild Cheddar Cheese instead of 2 different kinds
1 1/2 cups grated monterey jack pepper cheese
3/4 cup milk
salt and pepper
Optional: I added a small can of Diced Green Chiles
Directions:

1 Grease the bottom of the crock pot.
2 Layer 1/2 the tater tots on the bottom of the pot.
3 Sprinkle with 1/4 of the jar of bacon bits.
4 Combine the two cheeses, and sprinkle 1/3 of it over the bacon and tots.
5 Top cheese with the chicken breasts.
6 Sprinkle chicken with salt and pepper to taste.
7 Top chicken with another 1/3 of cheese.
8 Sprinkle with another 1/4 of the jar of bacon bits.
9 Add remainder of the tater tots.
10 Top with final 1/3 of the cheese.
11 Pour milk over the top.
12 Set crock pot to high and cook 3-4 hours.


Linking-up!

August 27, 2012

Boyfriend Cookies

This weekend my mom and I baked Boyfriend Cookies from pinterest - they were DELICIOUS - about 5 different kinds of candy in them, so good!  Recipe found here.

July 30, 2012

Summer Dip & Hawaiian Roll Sandwiches

Recipe #1: Summer Dip // I learned this recipe a few years ago from a friend of a friend and it has developed over time and I've added more and more ingredients:
  • Bean Dip
  • Sour Cream
  • Cheddar Cheese
Optional:
  • Diced Green Chiles
  • Jalapenos
  • Black Olives
Mix bean dip, sour cream and green chiles together.  Top with cheddar cheese, jalapenos and black Olives.  Eat with Pita Chips. 

I take this dip out on the lake almost every time we go and it's the first thing to get eaten.  It might sound a little weird with bean dip and sour cream, but I promise it WILL NOT disappoint!'


Recipe #2: Hawaiian Roll Sandwiches
  • Hawaiian Rolls
  • Sliced Cheese
  • Turkey or Ham
Unfortunately I have to give credit to my brother Cy for this idea, it's brilliant!  Perfect for the lake, picnics, any time you need to keep sandwiches in a cooler, this is the way to go!

Open package and pull all the rolls apart. Keep them in the same order that they came in the packaging, this will make it easier to put them all back together. 

Slice the rolls in half using a serrated knife, but don't slice all the way through.

Place half a piece of cheese and a piece of meat on the rolls.

 Fold rolls back together and keep in the cardboard packaging.  This will keep the sandwiches from getting soggy in the kooler.  Place back in the bag.  The perfect sandwich!

 Take the dip and sandwiches out on the lake and enjoy your day!


Don't forget Meg and I will be having a Bachelor Pad Blab and Gab Link-Up tomorrow.  I will post the button in my sidebar!

How was your weekend?

Linking up for the weekend wrap-up!

LinkWithin

Related Posts Plugin for WordPress, Blogger...