Showing posts with label Nursery. Show all posts

May 14, 2014

Gray, White & Yellow Nursery

When I found out I was having a boy I immediately started pinning different ideas for nurseries.  I knew Gray, White and Yellow was the color scheme I was going to use so I started scowering stores for all things nursery!  Surprisingly it waspretty difficult to find decorations in yellow, I was shocked by the lack of yellow nursery decor.

Here's what I came up with:


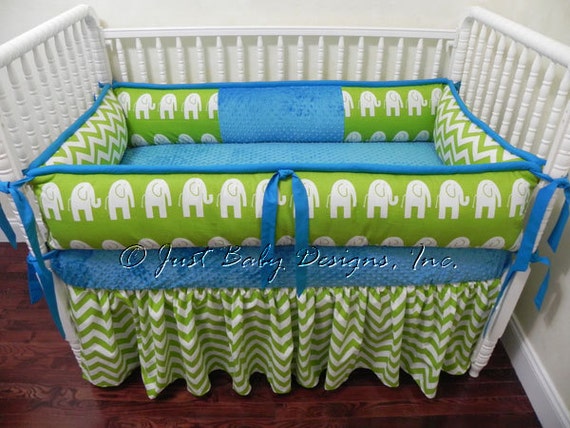
The one thing that I love most about this room is that it could easily be changed to make into a girls room.  Just change the Yellow accents to pink/purple or another girly color.  It could also serve as a gender neutral nursery if you didn't know what you were having!

Here's all the Details to my Gray, White & Yellow Nursery (everything was purchased in 2013, so I'm not sure what items will still be available):
Crib: Lone Star Baby / Brand Munire
Sheets: Target
Brown Bear: Gift from my mom
Quilt: Gift from my cousin (she actually made it)
Stuffed Elephant: Scentsy
Lamp: Garden Ridge
Elephant hanging on Wall: Hobby Lobby
Shelving Unit/2 Drawers: Home Depot
Decorations in shelves: All gifted
Chair: Buybuy Baby
Pillow: Gift from my cousin (homemade)
Curtains: Buybuy Baby (On sale and they just so happened to match my entire room, double bonus)
Rug: Costco
Light: Lowes
Light switch Cover: Hobby Lobby
Changing Table: Old Hutch that I purchased from a Garage Sale and re-did
Knobs: Hobby Lobby
Changing Pad Cover: Buybuy Baby
DAX Letters: Hobby Lobby, we painted them
Dream Big Little One: Target
Someday I will Change The World: Hobby Lobby
Elephant Chair: Gifted

Here's Where we started, I sure am happy with how it has evolved!


Momaroo on the left by the curtains (barely shown)


The kitties were VERY interested in all of the new stuff!
No kitty, this is NOT your bed!
This isn't either!!!

The one thing I love most about the nursery is that it's very calming and peaceful.  I rock the baby in that rocking chair at least 4 times a day and I absolutely love it.  One of the best investments we have ever made! I like that the arms of the chair are really low so I can rest my arms on them when I'm rocking the baby, it really helps!

What do you think of the nursery?  Would you use this color scheme?

September 17, 2013

Decisions Decisions....

Being pregnant has made me one of the most indecisive people in the world!  On top of that it's the absolute worst time to be indecisive, there are so many decisions to be made...

What color to paint the nursery, which crib, what color, which glider, what stroller, which is the safest, what baby bedding, should I do a bumper or not, window treatments, changing table, closet organization... Okay you get the idea, the list is endless!  I would drive myself insane if I tried to list it all!

One of the decisions I've been agonizing over is the crib bedding.  Originally I was set on ordering this set from etsy.  I was going to change the colors to gray, white and yellow, but now I'm just undecided!

Baby Bedding By JBD
If I order this bedding, I will always have to use plain sheets (white girl problems) since there's a pattern on the bumper... The elephant pattern is my absolutely favorite and I'm also loving another giraffe pattern., see below:

I think I've decided just to go with a a colorful patterned sheet and incorporate the elephant and giraffe pattern into pillows and other pieces of the room - what do you think?

BabyCribSkirts

I'm drapes in the patter below in Yellow. They are only $45 for a pair, which is even a better price than I've seen in stores:

MiaBellaBella
Opinions anyone? Suggestions?  Anyone want to make these decisions for me??

September 10, 2013

Project Nursery


I'm happy to say that the nursery is FINALLY coming along.  Right when I hit 20 weeks I started panicking that we ONLY had 20 weeks left! I know, I know, it sounds like a long time, but considering I have 5 baby showers, the Holidays ANDThird Trimester exhaustion I thought we better get started!!

The crib is on order and scheduled to arrive at the end of October!  I CAN NOT WAIT!!

I went shopping last weekend and bought the glider from Buy Buy Baby.  Thankfully they had them in inventory and it's already all set-up.

A little bit of Inspiration:


Here's what we've done so far:

  • Painted the Entire Room Gray (Behr Silver Sateen Home Depot)
  • Painted White stripes on one wall for an accent (Behr Snow Fall, Home Depot)
  • My husband and Father-In-Law installed crown molding (Home Depot)
  • Installed a New Light ($39.99 Lowes)


It might seem a little under-whelming to you, but we have already put a huge amount of work into this nursery and this is just the beginning!

I bought a dresser from a garage sale for 50 bucks and I'm planning on re-doing it for a changing table!

I can' wait to get more done and start decorating!  What do you think about it so far??

September 5, 2013

DIY: Closet Size Separators


I have no idea what these things are actually called, but they are hangers you put in your baby's closet to separate all the different sizes.

My college roomie just so happens to also be pregnant too and we decided to make these together! Lunch, shopping, crafting and eating Nothing Bundt Cakes made for the perfect Saturday afternoon.  The baby has been craving lemon! Speaking of which I kind of want one right about now...

Ask me last summer what I would have been doing on a Saturday afternoon and it would have been 100% different! Sipping cocktails and soaking up the sun in a bikini! This summer was nothing like that, but it was still enjoyable just in a different non-drunk kinda way...

What you need:
  • Wooden Hangers from Hobby Lobby
  • Acrylic Paint
  • Wooden Animals also from Hobby Lobby in the craft section
  • Paint Pen
  • Hot Glue
  • Ribbon (to hang on the rod)
 Instructions:
  1. Paint Hangers, at least 2 coats!  We were impatient waiting so we had to eat some bundt cake in between drying
  2. Hot Glue Animals to the Hangers
  3. Write # of months above the animals
  4. Loop ribbon through the top of the hangers and hang on the closet rod.  Like the last post I haven't quite gotten to the last step here, but it should be really easy!  We are still getting the closet ready, so once it is I will post pics.

September 3, 2013

Sleeping Yet Crafting


I haven't been blogging so what in the H-E-Double Hockey Sticks have I been doing?  ONE SIMPLE WORD: SLEEPING!!!

You would think I would be spending all my time crafting, laying in the sun, trying new recipes, planning for baby... nope none of it! Just sitting on the couch watching TV, playing Candy Crush and drifting in and out of mini cat naps..

My brain runs about a million miles a minute thinking about all the thing I SHOULD be doing, but I just can't motivate myself to do it.  About every 30 minutes I have to get up and go to the bathroom which is super annoying because it cuts into my aforementioned TV and Candy Crush time.

Sleeping is my best friend right now, I know this, I'm aware of it and I'm TERRIFIED of losing it. Every since I was a teenager I've been able to sleep 12-13 hour nights. Knowing that 12-13 hours of sleep will soon be the amount I have in 2 - 3 nights is seriously scary!  When I'm running on little to no sleep I'm incapable of acting like a human being... Kinda like this...


I know I'm pretty late to the game in talking about Miley, but seriously... WTF is that girl on?  I was so disturbed watching her and that foam finger gyrate all over the stage!  Regardless, it was entertaining and people gave her the attention she wanted so I guess it was a win-win for her!

Back on another note I actually got motivated to do a miniature craft project tonight.  We painted the nursery this weekend and realized we couldn't put the UGLY switch plate covers back on.  So naturally I googled some images and found custom ones on Etsy for $16!!! WHATTT?? No thank you! Being the bargainista that I am I decided to craft my own for 59 cents (cost of scrapbook paper, I already had everything else),

What you Need:
  • 1 UGLY switch plate cover
  • 1 piece of scrapbook paper
  • Exacto Knife (I almost spelled it Nife, PREGNANCY BRAIN)
  • Mod Podge
Instructions:
  1. Cut scrapbook paper about 1/2 inch larger than switch plate.  
  2. Place mod podge on the back of scrapbook paper and secure to switch plate.
  3. Fold in the corners like you are folding a present and use mod podge to stick them down.
  4. Using the exacto knife cut a small square in the area that the light switch will be and use mod podge to glue it down.
  5. Flip over and mod podge the front.
  6. Let Dry.
  7. Install (haven't gotten to this part yet, will share pictures once I do...)

The Kitties were exhausted from helping me!!
Well, I have now blogged 2 days in a row, I'm exhausted!  Have a wonderful Wednesday everyone!


LinkWithin

Related Posts Plugin for WordPress, Blogger...